The five recipes that will make you fall in love with your kitchen gadgets all over again
This might come as a surprise to those of us who use our air fryers religiously, but recent research from Material Focus, the not-for-profit organisation behind the nationwide Recycle Your Electricals campaign, suggests that Britain’s enthusiasm for the magic machine is already waning. There are an estimated 20.9 million air fryers in households across the UK, but reports show that more than 2 million of them are no longer being used or have already been thrown away.
Mine is used daily, but I can think of a few kitchen gadgets that were bought with enthusiasm only to be shoved to the back of the cupboard – or even banished to the shed – never to see the light of day again.
While you might not be convinced to dust off your multi-layer vegetable hydrator or pricey masticating juicer, there are five fantastic appliances that I think do deserve a second chance to shine – and here are the recipes to celebrate their return to the kitchen.
Skip to:
ADVERTISEMENT
Mini waffle maker: crispy ‘sushi’ waffles
Pasta maker: handmade ricotta ravioli
Pressure cooker: chicken and chorizo risotto
Soup maker: simple pea and watercress soup
The air fryer sees daily usage in my kitchen, particularly for cooking small portions of food, such as a batch of crispy fish fingers for a quick sandwich or an individual pie straight from the freezer, or for reheating a lone slice of leftover pizza.
If your enthusiasm for it has dwindled, let me remind you that, despite the small cooking area, an air fryer can be really useful when cooking for the whole family, too. As well as being quicker, it’s far more energy-efficient than turning on the oven just to cook a single dish and it’s suitable for much more than just crisping up oven chips. It’s also great for baking and roasting, with single-drawer models generally able to accommodate a medium-sized whole chicken or smaller joints such as this cracking crispy belly pork.
The air fryer gets the skin extra crispy - Andrew Crowley
This easy recipe uses a salt crust to achieve the crunchiest crackling and is such a family favourite that it earns the air fryer a place on my kitchen counter just on its own.
Prep time: 15 mins
Cook time: 1 hour 30 minutes
Serves: 4
700g belly pork, skin scored
6 garlic cloves, peeled and halved
2 tbsp Chinese five spice powder
3 tbsp fine sea salt
3 tbsp soy sauce
2 tbsp rice wine vinegar
2 tsp crispy chilli oil (available from Ocado)
Cooked rice or noodles and steamed greens, to serve
Using a small, sharp knife, make deep incisions in the flesh of 700g belly pork and push in 6 halved garlic cloves. Dust the flesh generously with 2 tbsp Chinese five spice powder (you may find it easier to do this on a board or piece of baking parchment). Turn over the pork and sprinkle 3 tbsp fine sea salt over the rind so it sits in a relatively even 2mm layer.
Heat the air fryer to 160C. Place the joint in a suitable dish and air fry for 1 hour. During this time, the salt will have formed a hard crust that lifts away from the skin at the edges. Using a small palette knife, lift off the salt layer and discard.
Return the pork to the air fryer for a further 30 minutes at 205C (or as high as your machine will go) until the skin is crunchy and dark golden and the meat is completely cooked through.
Meanwhile, mix 3 tbsp soy sauce, 2 tbsp rice wine vinegar and 2 tsp crispy chilli oil together in a shallow dish. Sit the cooked pork in the sauce and leave to rest for 10 minutes before slicing thickly.
Have you had your fill of Korean-style croffles (croissant waffles) and keto-friendly chaffles (cheese waffles) and now relegated the cute electric mini waffle maker that TikTok made you buy to the back of the cupboard? Then this is the reason to save it from a trip to the charity shop.
ADVERTISEMENT
Cooking portions of cooked rice in a mini waffle maker is a truly brilliant way to use up leftovers and the method comes into its own when you’re looking for a quick lunch that’s not just another sarnie. The resulting crunchy rice waffle makes a fabulous base for anything you fancy, from the sushi-style fillings used here to egg mayo or any of your usual sandwich fillings and toast toppings.
You can cook a rice waffle (riffle?) for anything from 5 to 15 minutes and while it won’t change much in appearance, it will evolve from crispy with a soft centre to super-crunchy depending on how long you cook it. Personally, I’m all for a tooth-cracking texture.
Be creative with your toppings: sriracha mayo and wasabi work well - Andrew Crowley
Leftover white rice crisped up in a mini waffle maker makes a satisfying crispy base for this sushi-inspired snack.
Prep time: 10 mins
Cook time: 5-15 minutes
Serves: 2 (makes 4)
400g cooked white rice (my preference is jasmine but any is fine)
1-2 tbsp vegetable oil
60g king prawns, shredded surimi or smoked salmon
1 small avocado, diced or smashed
1 baby cucumber, thinly sliced
ADVERTISEMENT
To garnish
2 tbsp sriracha mayo
1 tsp sesame seeds and/or nori powder
A sprinkle of mustard cress
1 tsp wasabi paste and or 2 tbsp soy sauce, to serve
Heat the waffle iron. Divide 400g cooked white rice into 100g portions. Preshaping the rice isn’t strictly necessary but it helps to quickly create a neat, circular shape. Brush a small bowl with a little oil and add the rice, pressing it down firmly with the back of a spoon. Tip out the rice disc onto the surface (it may need a little shake to come loose from the bowl).
Brush the waffle plates with a little oil. Add the rice and press down firmly. Cook for 5-15 minutes until crispy. Repeat to make more rice cakes.
Arrange 60g king prawns, shredded surimi or smoked salmon with 1 diced small avocado and 1 sliced baby cucumber on top. Garnish as you like.
This method also works brilliantly with leftover potatoes (if you don’t have any to hand, prick a medium-sized potato then microwave on high for 5 minutes). Press into the warm, oiled mini waffle maker and cook for 10-15 minutes until golden and crunchy.
Dust the surface with semolina to prevent the pasta from sticking and to add a little extra bite - Andrew Crowley
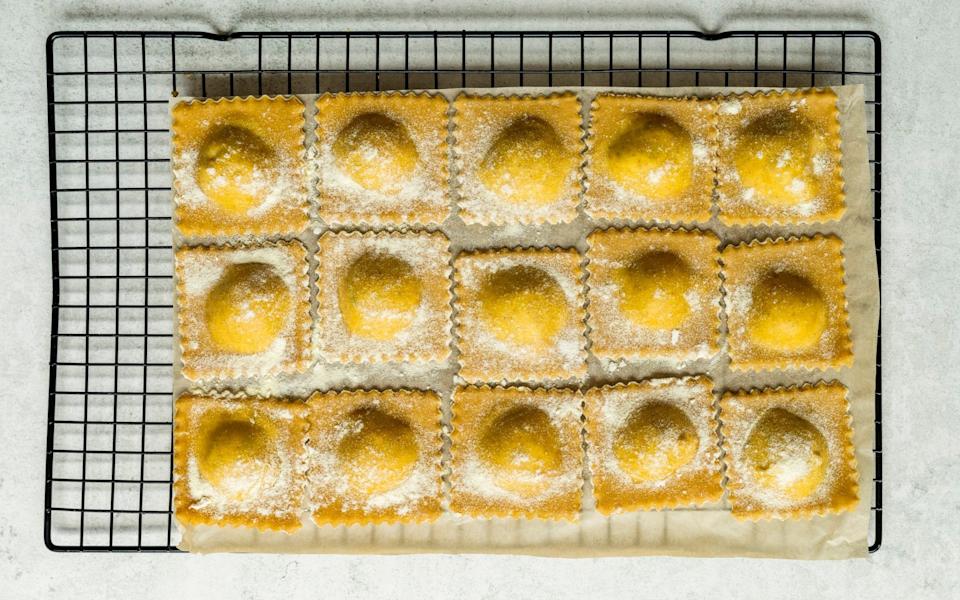
I’m a keen pasta maker, but the shape passed down to me and the one I make most often is cavatelli, which, like my family, hails from Puglia and is shaped with just the fingertips. So while my pasta maker doesn’t make an appearance very often, it is essential when sheets of pasta are called for to make lasagne or filled shapes such as tortellini or these exquisitely simple ravioli.
ADVERTISEMENT
When I do make the effort to get my machine out, it’s so rewarding to watch a small ball of dough magically extend along the kitchen counter, inevitably leaving me asking myself why I don’t use my pasta machine more often. A rolling pin can do the job but it’s very difficult to achieve the same even thinness as with a machine.
Mixing the dough directly on the counter looks terrific on social media but in my experience the eggs always make a break for freedom and trickle out from the flour in several directions, quickly becoming uncontrollable. Make your life easier and begin the process by placing the flour in a large bowl (or alternatively, use a food processor).
When making egg pasta, rather than adding an extra yolk or two as some recipes specify, to keep things simple, I stick to a ratio of 1 egg to 100g of flour and choose golden yolk eggs for the brightest yellow hue possible. I opt for extra fine 00 flour but plain flour also works well, and if you have any fine semolina to hand it’s useful for dusting the surface to prevent sticking and adds a little extra bite to the finished pasta. I don’t salt the pasta but always generously salt the cooking water.
A pasta machine achieves a thinness that is much more difficult to get with a rolling pin - Andrew Crowley
Rolling and shaping fresh ravioli takes some time but it’s an enjoyable activity and the end results are well worth the effort. Pistachio pesto is particularly delicious but you can use any sauce you wish or simply toss the ravioli with flavoured butter or some good olive oil and a sprinkle of Parmesan.
Prep time: 50 mins, plus resting
Cook time: 5 minutes
Serves: 4
300g 00 pasta flour, plus extra for dusting
3 eggs, preferably golden yolks
1 x 250g tub ricotta
40g Parmesan, finely grated
4 tbsp finely chopped chives or spring onion
Zest and juice of 1 lemon
For the pesto:
100g pistachio kernels
Leaves from a 50g bunch basil
50g Parmesan, grated
1 garlic clove, finely chopped
100ml olive oil
Place 300g 00 pasta flour in a large bowl then make a well in the centre. Crack in 3 eggs and, using a fork, gradually incorporate the eggs into the flour to make a firm dough (alternatively, use a food processor). Tip out onto the work surface and knead for 10-15 minutes until smooth and silky-textured. Cover and leave to rest for 30 minutes.
Meanwhile, make the filling: drain any liquid from the 250g tub of ricotta and place the cheese in a bowl. Add 40g finely grated Parmesan, 4 tbsp finely chopped chives or spring onion, zest of 1 lemon (keep the juice for serving) and plenty of seasoning, and mix well together.
Next, make the pesto. Lightly toast 100g pistachio kernels in a frying pan until golden then tip onto a plate and leave to cool. Using either a pestle and mortar or a small food processor, grind together 50g basil leaves, 50g grated Parmesan and 1 finely chopped garlic clove, then gradually work in the nuts and 100ml olive oil to make a creamy paste. Season to taste.
Cut the pasta dough into four pieces so it’s easier to work with. Pat the dough out to a thickness of around 1cm then, starting with the widest setting, run one piece of dough through the pasta machine (keep the rest covered to prevent drying out). Repeatedly pass the dough through the machine, working down to the thinnest setting. Dust the machine and the work surface with semolina or flour as you go to prevent sticking or tearing.
Cut one sheet of pasta in half so you have two equal lengths. Lay out on a well-floured work surface, then spoon heaped teaspoons of the filling, spaced 5cm apart, over one of the pasta sheets. Brush the pasta around the filling with water. Gently lift the second pasta sheet over the fillings, and use the side of your hand or fingertips to press the pasta together around the fillings to seal while aiming to ensure there’s no trapped air.
Stamp out the ravioli using a 5cm cutter (a cookie cutter is fine) or cut into squares with a sharp knife. Lay out in a single layer, on trays or cotton tea towels dusted with semolina or flour, repeating and re-rolling the trimmings to make 20-24 ravioli.
Cook the ravioli in batches in a large pan of gently simmering salted water for 2-3 minutes until the pasta is cooked. Remove with a slotted spoon and continue until all the pasta is cooked. Add the sauce and a splash of the cooking water and gently toss together to coat evenly, add a squeeze of the lemon juice too, if you like.
As time-and-energy-saving devices go, the pressure cooker is high up on the list. Whether old-school stovetop or high-tech electrical, it works by using a tight seal which allows high-pressure steam to build up during cooking, raising the temperature inside the pot to above the boiling point of water. This speeds up the cooking time, rapidly tenderising cheaper cuts of meat and ingredients such as dried beans and pulses.
Most machines have a sauté function, which is worth using for browning off meat or softening onions before the lid is locked on. While I mostly use mine for its time-saving benefits, pressure cookers are also terrific at cooking rice. The cooking time might not be any quicker but the results are perfect and fluffy every time with no sticking. It gives wonderfully creamy results when making risotto and without the need for any laborious stirring.
Let the pressure cooker do the work for this easy risotto - Andrew Crowley
This simple and fail-safe method uses the classic combination of chicken and chorizo for a flavoursome, creamy risotto. The texture may seem a little soft when the pressure is first released but the rice will quickly absorb any excess liquid.
Prep time: 10 mins
Cook time 15 minutes, plus 15 minutes press building time
Serves: 4
Knob of butter or 2 tbsp olive oil
1 large onion, chopped
65g diced chorizo
500g chicken thigh fillets, cubed
2 rosemary sprigs
2 garlic cloves, finely chopped
1 tsp hot paprika
400g risotto rice
125ml glass dry white wine
1.2 litres chicken stock, warmed
4 tbsp freshly grated Parmesan
4 tbsp finely chopped parsley
Set the pressure cooker to sauté mode. Add a knob of butter or 2 tbsp oil to the pot and cook 1 chopped onion and 65g diced chorizo for 3-4 minutes until softened. Add 500g cubed chicken thigh fillets, 2 rosemary sprigs, 2 finely chopped garlic cloves and 1 tsp hot paprika and stir fry for 2 more minutes.
Add 400g risotto rice and stir for 2 minutes until the grains are slightly translucent around the edges. Add 125ml glass dry white wine, scraping up any browned bits from the bottom. Cook, stirring, until the wine is almost fully absorbed, about 1-2 minutes.
Stir in 1.2 litres warmed chicken stock. Place the lid on the pressure cooker and set the programme to cook on high pressure for 5 minutes. It will usually take about 10-15 minutes to build pressure before the 5-minute cooking cycle begins.
Once the cooking cycle is complete, allow the pressure to release naturally for 5 minutes. Then fully release the pressure.
Vigorously stir in 4 tbsp freshly grated Parmesan and 4 tbsp finely chopped parsley, you can add more butter at this point too if you like. Check the seasoning and serve swiftly.
I’m a real fan of the soup maker and find it a life-saver when working from home. They’re a brilliant way to transform a few bits and bobs from the fridge into a filling meal without requiring much effort. Once the ingredients are loaded into the jug, you’re free to get on with work or pop to the shops while lunch is being taken care of as most models will flip into “keep warm” mode until you’re ready to serve up.
While some soup makers offer a sauté function for softening onions and garlic, the surface area is usually too small to be practical. Using a frying pan first sort of defeats the object, so I tend to opt for throw-it-all-in soup recipes. My preference is for the smooth setting (rather than chunky), which means you don’t need to worry about how roughly you chop the vegetables before adding to the jug as they’ll end up blitzed into a velvety-purée anyway.
Texture-wise I’d always recommend adding a thickening ingredient such as a couple of cubed potatoes, some leftover cooked rice or a couple of slices of bread to give some body to the finished soup.
As soup makers vary in capacity, you may need to slightly tweak the quantities given below to ensure the liquid doesn’t go above the maximum level on your machine. And one last tip, always use hot stock so the machine reaches cooking temperature as quickly as possible.
Top the soup with a swirl of cream - Andrew Crowley
This is a very simple green soup using the kind of vegetables I always have to hand and it is endlessly adaptable. Vary the greens to include kale, cabbage or spring greens or if you like, add some diced pancetta, chopped bacon or ham to the mix. There are plenty of ways to boost the flavours if you choose to – try adding some fresh ginger or mint or a sprinkle of ground cumin or chilli flakes or a good squeeze of lemon juice.
Prep time: 10 mins
Cook time: 30 minutes
Serves: 4
1 large leek, thinly sliced
2 garlic cloves
2 potatoes, about 600g, peeled and cubed
200g frozen peas
60g watercress
1 litre chicken or veg stock, warmed
100ml double cream (optional)
Crusty bread or toast, to serve
Place all the ingredients in the soup maker, ensuring they reach but don’t go above the maximum level.
Select the smooth setting. Once the soup is ready, check the seasoning then pour into bowls and top with a swirl of cream, if liked.
……Read full article on Yahoo Lifestyle - Food
Food & Beverage Singapore Lifestyle

One-stop lifestyle app dedicated to making life in Singapore a breeze!


 English
 简体中文
简体中文
Comments
Leave a comment in Nestia App